I can't believe it has been over a month since I have posted. I had so much going on, a sick daughter and traveling across country to be with her (she is better now). Going back to work behind schedule and having to make up for it in double time. A move (I hate moving), packing, unpacking, all the awful things that go along with moving, and the saddest of all ~ a broken cricut after the move! :(
I know I can craft without it, I have before, sometimes I like to make cards purposely without my cricut, but I just can't seem to get out of this craft-free funk! Ohwell, I do pop on now and then because I love to see all the amazing things you all do... and you do!
N-E- Way.... I will get back to it soon, in the meantime, I will keep watching what you all do! :)

Friday, December 3, 2010
Wednesday, October 20, 2010
Cricut Cardz Challenge #47 ~ Breast Cancer Awareness Card
October is Breast Cancer Awareness month so the challenge this week at CCC is to make a card with that in mind. Mary sure had my brain wracking on this one!! If you, like me, love to be challenged to think outside the box, then be sure to join in on this fun and important challenge by clicking here.
For my DT card, I decided to make cards for my sisters and push the awareness theme. I hope you are inspired to share this important message too. Here is the front of my card.

And this is the inside message I wanted to send to my sisters. :)

Details:
The dress is made from 4 oval scallops, folded and arranged together. I actually used a scallop circle from Cindy Loo and then resized it to an oval shape. I inked my swiss dots cuttlebug folder with pale pink chalk ink from memento and then ran it through, I hope you can see the tiny pink dots. The tag on the front was cut from Fabulous Finds. Papers are from PaperTrey Ink and DCWV. Ribbons from my stash. Memento Inks. Sentiments made on my computer.
For my DT card, I decided to make cards for my sisters and push the awareness theme. I hope you are inspired to share this important message too. Here is the front of my card.


Details:
The dress is made from 4 oval scallops, folded and arranged together. I actually used a scallop circle from Cindy Loo and then resized it to an oval shape. I inked my swiss dots cuttlebug folder with pale pink chalk ink from memento and then ran it through, I hope you can see the tiny pink dots. The tag on the front was cut from Fabulous Finds. Papers are from PaperTrey Ink and DCWV. Ribbons from my stash. Memento Inks. Sentiments made on my computer.
Wednesday, October 13, 2010
Monogram Note Cards
I made these cute note cards with matching envelopes and a gift box for a neighbor of mine who was moving, and I wanted to share them with you all. I got this idea from a video I saw on YouTube a while ago made by the very creative Chic-n-scratch. I will try to find the video again and post a link here, she gives instructions on the box and the super simple matching envies. Hope you like these!

No cricut cuts here, just paper punches, a cuttlebug folder, ribbon, memento ink and my white gel pen. I used a white glitter sticker for the R monogram. I used it as a mask for the note cards, just inked over it and then removed it to make the colored circles with white Rs. Then, I used the -no longer white - R glitter sticker on the circle for the box. I liked the way that turned out because the R sticker on the box still looked glittery, even after all the inking. I also layered everything flat with no pop dots to keep them mail friendly. The envelopes are regular A2 envelopes, sealed and then the end cut off to the right size. Add your matching pattern paper by attaching about 1/2 inch down on the front of the envelope and then fold over a flap. I rounded the corners for a finished look and added some envelope glue.

No cricut cuts here, just paper punches, a cuttlebug folder, ribbon, memento ink and my white gel pen. I used a white glitter sticker for the R monogram. I used it as a mask for the note cards, just inked over it and then removed it to make the colored circles with white Rs. Then, I used the -no longer white - R glitter sticker on the circle for the box. I liked the way that turned out because the R sticker on the box still looked glittery, even after all the inking. I also layered everything flat with no pop dots to keep them mail friendly. The envelopes are regular A2 envelopes, sealed and then the end cut off to the right size. Add your matching pattern paper by attaching about 1/2 inch down on the front of the envelope and then fold over a flap. I rounded the corners for a finished look and added some envelope glue.
Wednesday, October 6, 2010
Thanksgiving Card for Cricut Cardz Challenge #45
Mary at Cricut Cardz Challenge has a Thanksgiving card challenge this week. This is going to be an easy one, anything goes! Use whatever cartridge and colors you want to use. Go join in the fun and get your Thanksgiving card uploaded for the challenge. And while you are there, check out all the other DT cards, here is mine:

I used three cartridges for this challenge - Doodlecharms, Create a Critter, and Martha Stewart Seasonal Cakes, and then I chalked and inked my cuts to give them some dimension.

I used three cartridges for this challenge - Doodlecharms, Create a Critter, and Martha Stewart Seasonal Cakes, and then I chalked and inked my cuts to give them some dimension.
Wednesday, September 22, 2010
Oh Baby! Cricut Cardz Challenge DT card
The challenge this week at Cricut Cardz Challenge is a fun one! Make a baby card using the colors green, yellow, orange and white only! (I remember when all baby things/cards were those colors because you didn't know the sex of baby until the delivery room!) Go here to get in on this fun challenge! And be sure the check out the rest of the DT's cards, they are impressive~wow!
I did a shape card, here it is:


For this card I welded the bib shape from Everyday Paperdolls to make the shape card. I should say here that I resized the bib to give it more of an oval shape by unclicking the chain before sizing height and width separately. Then I felt the neck opening was too small so I just made it a little bigger with my scissors after cutting. I think there are better bib cuts but not on any of my cartridges ~ probably New Arrival.
I also used the ducky from Doodlecharms and the 'Oh Baby!' from Stamping.
Paper was from DCWV, Bazzill & Papertrey ink.
I added some lace & ribbon from my stash, stitches with a white sakura gel pen and stamped the inside sentiment - not sure where I got that stamp.
Friday, September 17, 2010
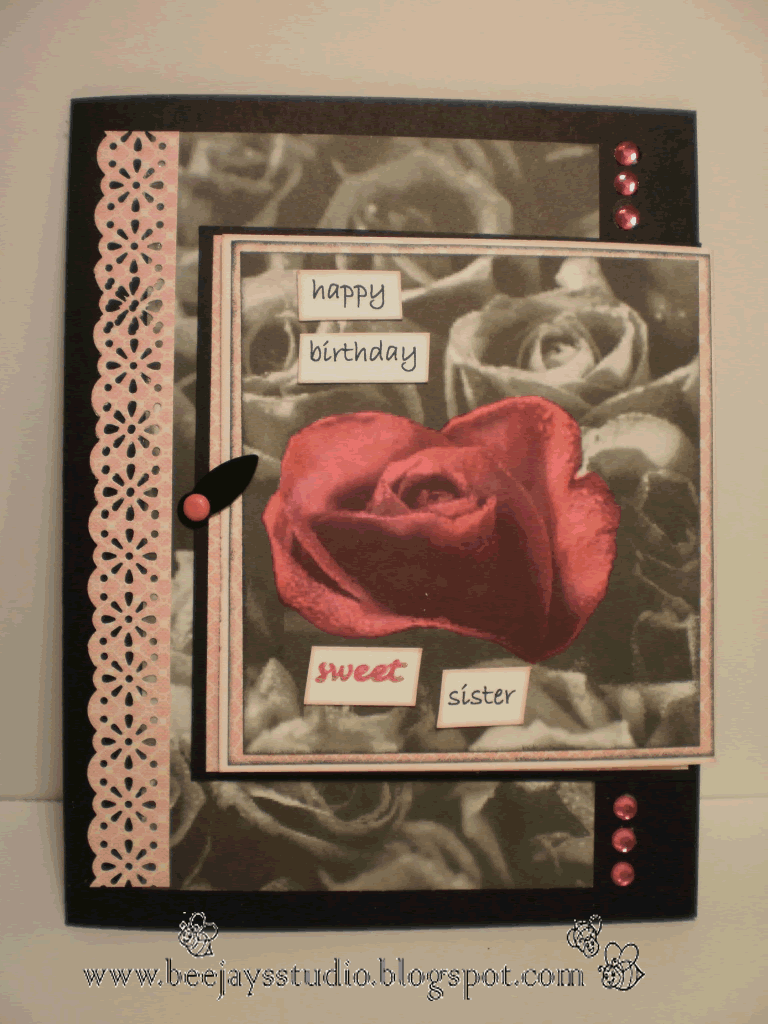
No cricut? No Problem!! Harley Birthday Card
Hey all! Happy Friday! I hope everyone has a great weekeend! I wanted to post a card I made for my sister's birthday. My cricut was unavailable temporarily but I wanted to get this made so I had to rock it old school ~ no cricut! But it is fun to do that once in awhile.
I wanted to post this because I think the fold is pretty cool, and I love the way it turned out where I used a red copic to color only one image on the black & white designer paper. The first layer is held in place with a brad and ...hmmm I don't know what those things are called???... can anybody help me out (see pic). Anyway, the first layer opens to the right to display a hidden panel on the card front, then the main card opens to the left. That first layer is continued on the inside of the card, like a smaller card, flipped to open the opposite of the main card. Hope you like it, I think my sister will!
Sentiment: (Front)"happy birthday sweet sister" (first open) "with the wild side" (Inside) "hope your birthday's a wild ride"


Materials:
Cardstock - Bazzill & Papertrey Ink
Designer paper - DCWV - black & white roses and I colored one rose with a red copic.
Border punch - EK Success
Also used was a sakura glitter pen to hightlight some of the words which were printed on my computer and cut out into small tiles and the edges inked
Not sure if you can see the inside clearly but there is a water mark of a motorcycle, this is where I will write my greeting.
Saturday, September 11, 2010
Spooky Halloween Card
I have been wanting to use this card feature cut from mini Monsters and decided on using it for this spooky halloween card. I love the cut because you open the fence to the right first, then open the card. I thought it looked like a fun card. If you have Mini Monsters, it is the card feature on page 72.
I also decided to do something a little differently and put all the cuts and embellies on the inside, while leaving the outside of the card a bit plain. I like the way it turned out, I hope you do too!


I am posting this card for Mary's Halloween Challenge at Cardz TV, go check it out, you don't want to miss this one!
Also, this is for Simon Says Challenge, any holiday card. They also have a blog hop, check it out!
Card Materials:
I cut everything from Mini Monsters except the cat and the drippy phrases, those came from MS Seasonal Cake Cartridge. (The little bat I already had in my stash, I think it is a Cuttlebug cut.)
My ghost has a Peachy Keen face.
I used core'dinations card stock which was perfect for the card cut because it was black on one side (for the outside) and purple on the other (for the inside). I also used some white Papertrey Ink cardstock.
I inked up with black and purple Memento Dew Drops inks, and gave it a misty look with white VersaMark ink.
And of course ~ googly eyes from Michaels - love using them!
Wednesday, September 8, 2010
Cricut Cardz Challenge #41 - my first DT card
Hi everyone! Head on over Cricut Cardz Challenge for challenge #41, and the 2nd half of the new design team's projects! This week's challenge is to make a fall themed card without using the colors - brown, orange or yellow. Well, I don't know about the rest of the country, but in Michigan, a favorite fall activity is visiting the apple orchard, so I based my card on just that, with the colors red and apple green in mind. Hope this puts you in the mood for hayrides and warm apple cider. I can't wait to see what you all come up with for this challenge!


I found these red & peachy coordinating papers in an old DCWV fall stack and thought they would be perfect.
Cartridges I used were:
Cindy Loo for the font
Doodlecharms for the apples and the basket
Monday, September 6, 2010
Blog Hop Winner!!
Hi everyone! I had so much fun with the 2nd Cricut Card Fairy blog hop, and I hope you all did too! Labor Day weekend activities with visiting family prevented me from completing a second project that I had in mind but I will get it done eventually and post it.
I am excited to announce the winner of the C-Gull Cricut Cartridge Storage Tote that I was giving away for the blog hop. But first let me say a big THANK YOU to all who hopped, commented, and especially those who chose be added to my follow list. I appreciate you more than you can know.
I put the name of every person who commented in "The Hat" and here is the winner (click on the image for a larger view) chosen at random:
Also, don't forget to visit Crystal's blog to find out who won the blog hop grand prize - three Cutting Cafe stamps sets of your choice. And thanks again to Regina for being so generous!
Thanks to all who joined in, have a great remainder of your Labor Day!!
hugs ~ beejay!!
I am excited to announce the winner of the C-Gull Cricut Cartridge Storage Tote that I was giving away for the blog hop. But first let me say a big THANK YOU to all who hopped, commented, and especially those who chose be added to my follow list. I appreciate you more than you can know.
I put the name of every person who commented in "The Hat" and here is the winner (click on the image for a larger view) chosen at random:

BlueRose said...Congratulations BlueRose! Please use the contact form on my blog to send me your address and your tote will be on its way.
Wow!!! I would like to thank you so very much on the lesson on how to make the dry-ease board. I never would of thought to make one. Oh, and the bag is so cute. Thanks so much♥
Also, don't forget to visit Crystal's blog to find out who won the blog hop grand prize - three Cutting Cafe stamps sets of your choice. And thanks again to Regina for being so generous!
Thanks to all who joined in, have a great remainder of your Labor Day!!
hugs ~ beejay!!
Friday, September 3, 2010
CRICUT CARD FAIRY BACK TO SCHOOL BLOG HOP AND DRY ERASE MEMO BOARD PROJECT
WELCOME!! I am so excited to be a blog hop partner with these amazing ladies again for this 3 day event! (Please go here to find out more about Cricut Card Fairies.) Oh my gosh, wait until you see what these talented ladies have come up with! We are all featuring back to school projects made with these wonderful digital stamps by Regina at the Cutting Cafe. And guess what?... Regina has been gracious enough to sponsor this blog hop by donating a grand prize, which means you can win not one... not two... but THREE Cutting Cafe stamp sets of your choice!! Wow, Regina is so generous, and so talented, you are going to want to visit The Cutting Cafe and check out her amazing artwork! To win this prize, you need to visit each lady participating in this hop and leave a comment on each blog... easy right? And as extra added bonus, you will have more chances for candy along the way from some of the participants!
So let's get to hopping!
If you need to start at the beginning of this blog hop, go to Crystal's blog to start. If you have come here from AJ713's blog, then you are on the right track. If you just have no idea where you are, there is a listing of all the participants at the end of my post.
For my project, I am using the School Borders printable stamp set. I had so much fun with this set, the hardest part was deciding which of these great borders to use.
MY PROJECT - DRY ERASE SCHOOL MEMO BOARD
My grandson started Kindergarten this year so I made this dry erase school memo board to help keep track of all those upcoming notes, papers, activites & forms. I used my Gypsy and welded his name to a rounded corner rectangle and cut it four times, twice out of chip board, once out of the background paper, and once out of a backing of a coordinating color cardstock. Then I cut just his name out of the same backing paper, and just the rectangle out of clear acetate card stock. Next I layered everything together except the acetate. I attached Regina's cute back to school border and those yellow pencils which I had colored with copics - then the acetate goes on top of everything. I attached a few eyelets, some clips for hanging artwork, school calendar or whatever, and a dry erase marker. Done! It is quite sturdy with all the layers. You can either put hangers on the back for hanging on the wall or magnets for the fridge - I will let my daughter decide which one she wants.


The finished memo board is about 8x10.5 inches. I will post more details on this project in a day or two, so check back later if you are interested in those details.
I will be posting another project later using these borders - wait until you see!
BLOG CANDY: You say you want blog candy???? Just comment on this posting. No need to follow me, but I will love it if you do... I will use "The Hat" random number program to pick a winner for this:
Cricut Cartridge storage tote by C-Gull. Really cute and functional, brown and pink. I only took it out of the plastic for photographs. I put it in my chair for the pictures to give you an idea of the size. Here is a store link that gives the dimensions, details and more pictures of this cool tote bag. Good Luck!


Okay, that's it for me for now, check back with me later for another project. And be sure to comment on this posting for a chance to win my candy and on every blog hop posting for a chance to win the grand prize. Now get on over to Pamela's blog because she has something so cute (I just saw it and it is amazing!!) you are NOT going to want to miss it!!
CRICUT CARD FAIRY LINE-UP:
Crystal
Gina
LYNNE
ScrappyJess
Kat/Bluerose
DDDCort
KarelJCreations
Sheryl
Larelyn
Kisatrtle
AJoy713
BeeJay <----- YOU ARE HERE
Pamela
So let's get to hopping!
If you need to start at the beginning of this blog hop, go to Crystal's blog to start. If you have come here from AJ713's blog, then you are on the right track. If you just have no idea where you are, there is a listing of all the participants at the end of my post.
For my project, I am using the School Borders printable stamp set. I had so much fun with this set, the hardest part was deciding which of these great borders to use.
MY PROJECT - DRY ERASE SCHOOL MEMO BOARD
My grandson started Kindergarten this year so I made this dry erase school memo board to help keep track of all those upcoming notes, papers, activites & forms. I used my Gypsy and welded his name to a rounded corner rectangle and cut it four times, twice out of chip board, once out of the background paper, and once out of a backing of a coordinating color cardstock. Then I cut just his name out of the same backing paper, and just the rectangle out of clear acetate card stock. Next I layered everything together except the acetate. I attached Regina's cute back to school border and those yellow pencils which I had colored with copics - then the acetate goes on top of everything. I attached a few eyelets, some clips for hanging artwork, school calendar or whatever, and a dry erase marker. Done! It is quite sturdy with all the layers. You can either put hangers on the back for hanging on the wall or magnets for the fridge - I will let my daughter decide which one she wants.


I will be posting another project later using these borders - wait until you see!
BLOG CANDY: You say you want blog candy???? Just comment on this posting. No need to follow me, but I will love it if you do... I will use "The Hat" random number program to pick a winner for this:
Cricut Cartridge storage tote by C-Gull. Really cute and functional, brown and pink. I only took it out of the plastic for photographs. I put it in my chair for the pictures to give you an idea of the size. Here is a store link that gives the dimensions, details and more pictures of this cool tote bag. Good Luck!


Okay, that's it for me for now, check back with me later for another project. And be sure to comment on this posting for a chance to win my candy and on every blog hop posting for a chance to win the grand prize. Now get on over to Pamela's blog because she has something so cute (I just saw it and it is amazing!!) you are NOT going to want to miss it!!
CRICUT CARD FAIRY LINE-UP:
Crystal
Gina
LYNNE
ScrappyJess
Kat/Bluerose
DDDCort
KarelJCreations
Sheryl
Larelyn
Kisatrtle
AJoy713
BeeJay <----- YOU ARE HERE
Pamela
Wednesday, September 1, 2010
Ribbon Rosette Thank You Card
Good morning everyone! Happy wednesday... just 2 more days until a nice holiday weekend, AND the Cricut Card Fairy blog hop. Be sure to stop back by for some great back to school projects, some awesome digi stamps, and lots of yummy blog candy! Starts friday so don't miss out!
I have done this card before as a birthday card, but I was commissioned to do a thank you version. The reason I am posting it again is because of the ribbon rosette I added to this version. I didn't have the right color flower but the perfect color of ribbon so I did this little rosette that I think goes perfectly! If you would like to learn how to do this, check out this you tube video from Butternut Sage Designs for a tutorial. I love this, it makes the perfect little embellishment! And it is fairly flat making it ideal for a mailable card.


Materials:
For those of you who did not see this when it was previously posted on my blog, I used one of the doily cuts from Cindy Loo, but hid the outside contour with the hide contour feature of Gypsy making it a window in my card. Once again, if anybody is interested in the cut file, you can request it using the contact form on this blog.
Paper is from Core'dinations.
Ribbon is a sheer one from Martha Stewart
Ink is Tim Holtz distressed.
I'm not sure about the stamp, just an old one I had hanging around.
I added little Teardrop Rain Dots in the top corners, these are from Cloud 9 designs and I have never used them before but I just love the effect.
Saturday, August 28, 2010
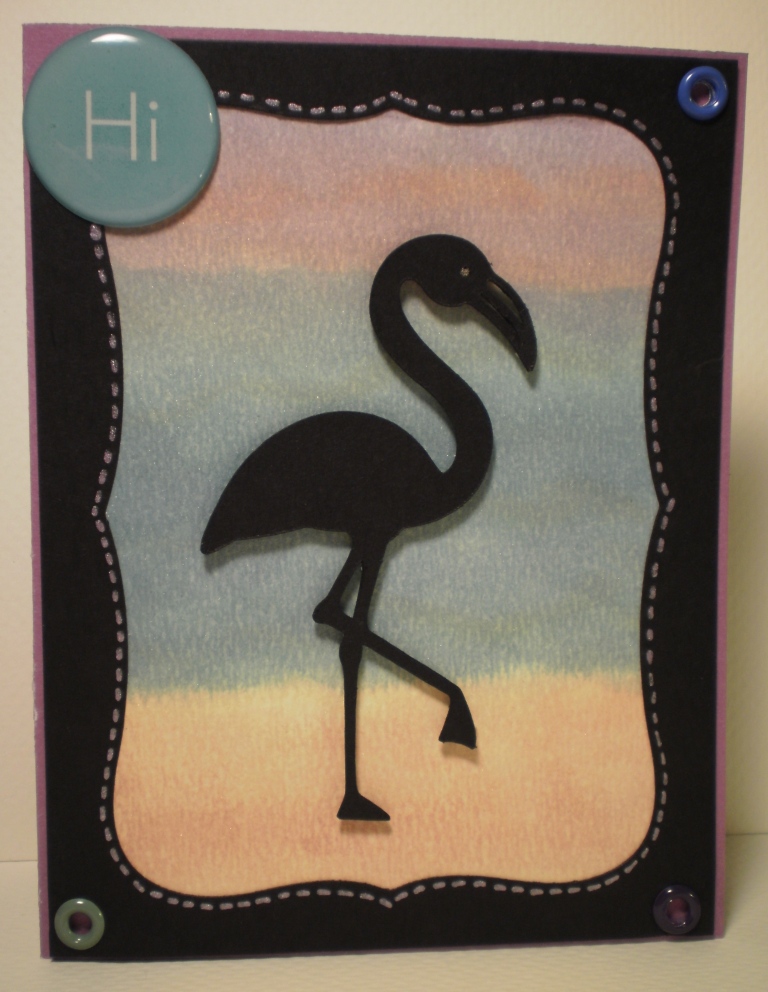
Love this flamingo cut!
I have never used this flamingo cut from Life's a Beach before but I think it is the cutest thing!
 This is a 'Hi' card that I am sending out for a Cricut Card Fairy mission. I am also posting this for challenges from Bitten By The Bug 2 - use a flamingo that is not pink, and Paper Cutz Challenge # 56 - use anything metal on your project.
Materials:
Flamingo cut is from Life is a Beach and mounted using pop dots.
I cut the black frame with Nestabilities Labels #8
The metal eyelets are from my stash
The 'Hi' embellishment is one that I had around, not sure where it came from but I thought the blue matched the background nicely.
My 'stitching' was done with a purple Sakura gel pen.
My base card is purple cardstock from Colorbok.
The colored background I made using a watercolor technique with Tim Holtz distressed inks. I also sprayed the background with Tattered Angels Gold.
The black paper is from Papertrey Ink.
Friday, August 27, 2010
A new baby!
A new grand baby is on the way!!! This will be our 7th grand baby and #7 is just as exciting as the first one! The only sad part is that my daughter and son-in-law live 2000 miles away. (They are not the parents of all the grandbabies, just one - soon to be 2.) Anyway, I am sending them this card to let them (again) know how excited and happy I am.

This card has also been posted for the Paper Cutz Challenge #55 where the theme was anything goes.
I also posted this one for Sweet Sunday Sketch Challenge #82. As you can see by the sketch below, I took some 'artistic license' with this sketch but I think that is allowed...right?

Materials Used:
The carriage is an old favorite of mine - cut a 3" circle and then remove a wedge shaped section. Easy Peasey!!
Scallop border cuts were all from MS All Occasion Cakes cartridge.
The font is from Cindy Loo (I love this Cindy Loo font but tonight I noticed that the MS cartridge I used has a very similar font so if you have that one, check it out.)
The sentiment 'small wonder' is from Stampin' Up!
Papers: (in green & peach because we don't yet know if it should be pink or if it should be blue) Core'dinations, The Paper Factory, Jeneva & company
Ribbon and pearls from my stash, and last but never least... Tim Holtz distressed inks.
Thursday, August 26, 2010
Lucky Me! A member of the new DT at Cricut Cardz Challenge
YAY! I am so lucky to be part of the new Cricut Cardz Challenge design team! There are 34 of us (wow) divided into 2 teams. I have been assigned to team 2 so I will be posting as part of the design team every other week. But don't wait for me, get over there now and check out the other team members because there is a whole lotta creativity and talent going on!
Mary at CCC has been a big inspiration for me. When I first got my cricut, I learned so much from her videos, and finally decided that I wanted to be a part of her challenges, which is why I started this blog. Thanks Mary!!
Don't miss out on the fun, the new challenge is up now, so visit CCC for the details!
Tuesday, August 17, 2010
Butterflies bring comfort
This card is for a Cricut Fairy Mission. A mother lost her child a year ago, and we hear that butterflies have always made her feel like her son was near, and this brings her comfort. I can't even imagine what this woman has been through, but if butterflies bring her comfort, I would like to send her a field full of them!
 Paper is from DCWV Y Core'dinations, flower stamp is Unity and sentiment is from Verve stamps, the butterflies were made with fiskars punches, and inks are Memento and Tim Holtz distressed.

Monday, August 16, 2010
Carve Your Own Stamps
A few people have asked me to post about a stamp I carved a couple of weeks ago for a card I made, so here is all you need to know to carve your own (simple) stamp. You can see the card I made here. I needed an ant stamp but could not find one that fit my design. While trying to find something that would work, I came across this stamp carving kit I had picked up at M's about a year ago. This stamp carving kit comes with a piece of rubbery material, reminds me of pink eraser material, I don't know if it's actual rubber. It also comes with a carving tool with 2 different blades, and an instruction manual with some art. Unless you are particularly handy with this kind of thing, I found solid stamp images - such as my ant - work best. I tried something more intricate when I first purchased this kit and... let me just say it wasn't pretty. Anyway, just pencil a design right on the rubber (don't forget you are working in the reverse direction your stamp will stamp) and start slowly carving away the material from the outside of your design. These blades cut through this stuff 'like butta' so it was easy carving. I think this kit was about $10 when I got it, I hope you try this, it was fun when it actually stamped the image I was going for!


Speed Ball Speedy-Carve stamp carving kit.
Sunday, August 15, 2010
What's the Buzz??
There is still time to get an entry in for Cricut Cardz challenge #37. Just make a card using only the colors orange, yellow, blue, black & white. Here is the card I will submit.


Materials I Used:
The flower was made by layering 1" circles after inking the edges.
The bee was cut from Just Because Cards cartridge, but I used acetate for the wings.
The sentiment is a stamp from Papertrey Ink.
Paper is from DCWV, Papertrey Ink, and Bazzill.
Saturday, August 14, 2010
Back to school card for a teacher
I made this card for my daughter who teaches 3rd grade in Arizona, I think she will love it!


I cut the bus using the Stretch Your Imagination cartridge, and the kids from Everyday Paperdolls. I used my craft knife to enlarge the windows on the bus so that the kids faces would show in the windows, then when you open the card, that is where the kids are. The papers are from DCWV and Papertrey Ink, the patterned papers is from an old DCWV fall stack. Peachy Keen stamps for the faces and my white sakura pen for some highlights and the 'chalk' message on the blackboard. The school zone sign was printed on my computer. And the sentiments I made with my label maker, first time using that on a card and I kinda liked it! :)
I am posting this card for Papercutz challenge #54, and Paper Playtime's challenge #11.
Why am I making Christmas Cards??
I have no idea, but here goes one. I used acetate card stock to make a 'french door with windows' type Christmas card. (I cut the windows and then attached the acetate behind the doors.) I have the cut file for cutting these window panes on a card if anybody is interested, just contact me using my contact form.
UPDATE: I should say what I actually have is the gypsy file for this cut, and the shapes I used for the window panes is from walk in my garden cart. Sorry for any confusion, I was the one who was confused :)
This Christmas tree cut is from Create A Critter, the snowman is from Winter Woodland and the bird wreath is from MS Seasonal Cakes. I ran the Christmas tree through my cuttlebug using the Herringbone embossing folder, and used stickles on the tree, wreath, and window panes.
Enjoy!


I am linking this card for the Be Inspired Challenge #96 at cuttlebugchallenge.blogspot.
Here is what we were supposed to do.
YOUR CHALLENGE: Use acrylic or acetate, and your Cuttlebug on your card, layout, home decor, altered item, etc. Post your project to LINKZ below by Tuesday, Aug. 17th, and you could be our next winner!
Thursday, August 12, 2010
Pink Cricut Stamps
Sarah at http://www.pinkcricut.com/ is about to release some new stamps that were designed to coordinate with cricut cartridges. I made this card to go with one of her Country Living stamps, SMOOCHES. You can see her stamps here.
.JPG)
.JPG)
For my project I cut the cow from Create A Critter, and the lips (love them!) from Indie Art. I don't actually have the stamps yet so I just printed the SMOOCHES sentiment on my computer.
Wednesday, August 11, 2010
Crystal Color Lacquer Card

Monday, August 9, 2010
Paper Playtime Challenge #10 Miss You
This card is going to my daughter who lives 2000 miles away from me. Love & miss you Stacey!!!
It is also for the Paper Playtime Challenge #10 - Miss You.

It is also for the Paper Playtime Challenge #10 - Miss You.

Materials Used:
Birds & branch cut from Straight From the Nest Cartridge
Paper is from Core'dinations and a DCWV stack called Linen Closet which I LOVE, the papers are so beautiful, and some are glittered.
The ribbon is from Martha Stewart
The sentiment "miss you like crazy" is from Verve stamps.
Sunday, August 8, 2010
Sweet Surprise - Paper Cutz Challenge #53
This card is going to a sweet friend who surprised me with a gift. I made this for Paper Cutz challenge #53, which required a project with an image of a monkey, skunk, squirrel or hedgehog. It is hard to see but the sentiment says "Such a Sweet Surprise". My skunk is hiding in a patch of sweet flowers, I hope my friend likes it!

Materials Used:
Skunk & Sweet sentiment from Create A Critter cartridge, borders are from Martha Stewart All Occasions Cake cartridge (love love that cart!)
Paper is from DCWV, Papertrey Ink and Making Memories
Flowers are from my stash (?)
Gave it some sparkle with Glossy Accents & Sakura gel & glitter pens.
Saturday, August 7, 2010
My take on Peachy Keen Stamps Sketch Challenge #34
Peachy Keen Stamps Sketch Challenge #34 uses the sketch below. This is my take on that sketch. This card is going to my sweet hubby who does indeed make my life a picnic!
Sketch:

My Card:

I used Doodlecharms cart to cut the watermelon, paper from Bazzill, Papertrey Ink and a DCWV stack, green ric-rac from Oriental Trading, Memento & Brilliance ink for stamping, Nesties labels #4, and the faces are from PK Simple Simon face assortment stamps. The ants... I could not find an ant border on my carts, I didn't have an ant stamp, I could not find an ant digi stamp I liked, but I did find a stamp carving kit I had purchased some time ago. So..... can you believe it, I carved an ant stamp! :)
8x8 Recipe Swap Layout
I joined my first swap on the cricut.com messageboard. I really had fun putting this together. It was an 8x8 recipe swap for quick breads, I chose Lemon-Blueberry Loaf - YUM! Here is my finished page.


Materials Used:
Patterned paper from a DCWV stack.
White cardstock from Papertrey Ink
Lemons & blueberries cut from the Preserves cartridge
Fonts are from the Nursery Rhyme & Ashlyn's Alphabet cartridges.
Inks from Tim Holtz Distress Ink
MS All Occasions Shape Card
I love the Martha Stewart cake cartridges!! Martha just always seems to do it better. I had to have these (All Occasions and Seasonal) because I fell in love with the borders, but look at this wonderful wreath that was on All Occasions! I made it into a shape card that is just perfect for saying 'hello' to a friend.


This card is about 4.5 x 4.75. I used my Gypsy to hide the inside contours of the wreath, made two copies of that and welded them together to cut the white shape card. Then I cut the wreath in green for the vine, and did the shift cut in yellow for the flowers. I did the flowers twice so I could cut some of them out and pop them up for dimension. I think the sentiment is perfect because these yellow flowers remind me of the summer sun. I would be happy to share the cut file for this card if anybody is interested. There is a 'contact me' link on my blog, just send an email and ask for the sunshine flower cut file. In fact, if you are interested in cut files, click here for two window cards I have cut files for using the Cindy Loo cartridge; if anybody wants them, I will be happy to email them.
Materials used in this card:
Gypsy, Cricut & Martha Stewart All Occasions Cake Art cartridge
Paper: green and yellow cardstock - Bazzill; white cardstock - Papertrey Ink
Ink: Tim Holtz distress inks for the edges of my cuts; Memento Dew Drops for the sentiment
Stamp: Hey there sunshine! from Verve stamps
Extras: Orange Peel stickles for the flower centers
Challenges entered with this card:
Sunday, August 1, 2010
Blog Awards
A short time ago I was so honored to receive a couple of blog awards from Dorcas of 4 crafty angels and I believe I am supposed to pass these awards on to people but I have been putting it off because it is tooooo hard to choose! But I would not want Dorcas to think I have blown off her award, so here goes. I am passing these awards to these people who have inspired me, made me smile, delighted me with their creativity. These ladies have shown me so much in a short time and I can't wait to see what they come up with next! Do yourself a favor and visit their sites.
Jess at scrappyjess.blogspot.com
Sheryl at sherylscraftingcorner.blogspot.com
Crystal at crystalscraftycreations.blogspot.com
Star at starspaperpassion.blogspot.com
Belinda at theembellishedcard.blogspot.com
Pamela at her blog.
Patti at pattiscards.blogspot.com
Terrie at terrie-paperaddict.blogspot.com
Storylady at cardswithmycricut-storylady.blogspot.com
So ladies, come and grab your buttons if you want them, and thanks for all you do.


Thanks again Dorcas, you are just the sweetest!
Saturday, July 31, 2010
Masculine Birthday Card
I needed to make a masculine birthday card and boy was I drawing a blank. Then I remembered that I had picked up some copper craft metal at J's a few days ago and decided to make that work. I like the way it turned out, lots of texture but very simple, perfect for the recipient. Thanks for taking a look.


No cricut on this one, obviously. All of my paper is from DCWV stacks. I embossed & distressed the brown background paper to look like leather and used the same embossing plate on the copper. Then I popped the copper up on foam tape, added a button, some leather cord with beads, a couple of grommets and a very few doodle dots. I think he is going to love the different textures.
Friday, July 30, 2010
Meow lite cartridge... a blog hop win!
I was so excited to get home from work today to find the cartridge I won from Pamela (you must visit her blog) during the blog hop! I got to choose from any of the lite cartridges and I chose Meow. I had so much fun playing with it tonight, I am so glad I picked this one. Thank you thank you thank you Pamela!
*** Oh and Pamela sent the cutest card with my cartridge - Thanks Pamela, so cute!! I almost missed it because it slid out of the package under the cartridge and right under the dining room table. ***
These little cats are so cute and playful I had to make that the theme of my card.

*** Oh and Pamela sent the cutest card with my cartridge - Thanks Pamela, so cute!! I almost missed it because it slid out of the package under the cartridge and right under the dining room table. ***
These little cats are so cute and playful I had to make that the theme of my card.

Actually I was inspired by my own two cats. Tigger is young, playful and full of energy and the orange and grey cat on this card represent him. My older cat Pilgrim, is aloof but lovable, a bit clumsy (aren't cats supposed to be graceful?) and quite chunky. The white pudgy cat causing the birthday sign to tilt and the black cat tangled in the yarn represent Pilgrim. Pilgrim also has solid black long fluffy fur and green eyes and sometimes you can't make out any of his features, just his eyes so I wanted the black cat on the card to look like that too. So this card gives you a glimpse of the kitties in my household, they are very entertaining and bring us lots of joy! I hope you enjoy!
Sunday, July 25, 2010
Cardz TV Christmas in July Challenge #4
Well this is the last of Mary's challenges at cardztv.blogspot.com and I am going to miss doing them! This challenge was to use a christmas tree on your card.


I chose to do an easel card because I wanted to put lots of dimension on my card. I used single and double layers of pop dots to put the gifts on a strip of cardstock, then popped that strip up on pop dots in front of the tree, which is also popped up. (Whew! Thatsalotta pops!)
Here are the supplies I used:
Christmas tree was cut from Create A Critter cartridge - I cut 3 of these and then cut the levels with scallop scissors and inked and layered the pieces to give my tree lots of dimension.
All paper is from DCWV - cardstock, Christmas Stack, and the tree was cut from an 8x8 sheet called green stained.
The sentiment is from Lizzie Anne designs Little Bits cling stamp set
Stickles to add lights to the tree, a foam sparkle star and ribbon from my stash, sakura glitter pens and dew drops to embellish.
Nestabilities labels #4 to cut the shapes for the sentiment.
I hope you enjoy, thanks again Mary for another fun challenge!
Thursday, July 22, 2010
Christmas in July Cardz TV Challenge #3

Well I am not sure if I made the deadline for posting this card, but that's okay, I had fun making it anyway. This is for Mary's Christmas in July challenge # 3 over at Cardz TV. The challenge was to use ribbon/lace/buttons... all 3 or any combination. This is a 5x7 card and all of the cuts are from Winter Woodland (just got it and was dying to try it out), with some sheer ribbon twisted around the trees. I liked the look of the ribbon twisted around the tree and will probably do a few more like this. Anyway, thanks Mary for another interesting challenge, I will be on time next time! :)
Wednesday, July 21, 2010
Want Blog Candy???
Now here is a fun way to celebrate your birthday! Jodi at Inked Inspirations is offering blog candy... for her own birthday! Click over to Jodi's Blog now for your chance to win. Thanks Jodi!
Monday, July 19, 2010
Thanks so much for a fun blog hop! And the winner is...
First let me say how much I enjoyed the Cricut Card Fairy Blog Hop this past weekend! Congrats Crystal on a successful blog hop!
To my new friends who visited me, thank you so much! I was overwhelmed by all the sweet wonderful comments, you are all truly appreciated!!
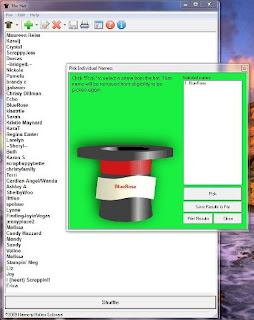
Now... who won the goodies you may ask?? First let me tell you about the process. I use a program called 'The Hat' from the good folks at Harmony Hollow Software. It is a freeware program so feel free to try it out. It is great for doing random draws or randomly matching pairs of names for a swap, etc. So basically I load all the names into 'the hat' and click on draw, at which time a name is randomly drawn. Here is a screenshot of the draw:

To my new friends who visited me, thank you so much! I was overwhelmed by all the sweet wonderful comments, you are all truly appreciated!!
Now... who won the goodies you may ask?? First let me tell you about the process. I use a program called 'The Hat' from the good folks at Harmony Hollow Software. It is a freeware program so feel free to try it out. It is great for doing random draws or randomly matching pairs of names for a swap, etc. So basically I load all the names into 'the hat' and click on draw, at which time a name is randomly drawn. Here is a screenshot of the draw:

So congratulations to 4boysisjoy! Please use the contact form to send me your address so I can mail your prize.
Friday, July 16, 2010
Welcome to the Cricut Card Fairy Blog Hop!!!
I am so excited to be a part of this great group of crafters, and the first Cricut Card Fairy blog hop!! If you are hopping along from the Peacock Paperie, welcome to my studio, you are in the right place! If you landed here accidentally and want to start at the beginning of this fun blog hop (and maybe pick up some goodies along the way), and learn more about Cricut Card Fairies, you can do that by clicking here .
Speaking of goodies, just follow me, then leave a comment on one of my featured projects, and you will be entered to win an assortment of wonderful embellishments, 13 packages in all! If you already follow me, just leave a comment and you will be entered! Good Luck!! Check back Monday morning to see if you are the lucky winner. Winner will be chosen with a random draw.

Speaking of goodies, just follow me, then leave a comment on one of my featured projects, and you will be entered to win an assortment of wonderful embellishments, 13 packages in all! If you already follow me, just leave a comment and you will be entered! Good Luck!! Check back Monday morning to see if you are the lucky winner. Winner will be chosen with a random draw.

So relax, stay awhile, check out my featured projects, and then continue the hop to Light Whimsy for some more fun!
Thanks for hopping by!!
Blog Hop Featured Project - Cutting Intricate Card Windows
I have been having such fun with my Cindy Loo cricut cartridge, especially the doilies, they are so cute! So when I saw the new hide contour feature on the Gypsy, I wondered if I could use that feature to hide the outside cut of the doily and cut an intricate window in a card. The anwer is yes!!
This first card is for a Cricut Card Fairy mission and the assignment was to make a pink get well type card. I don't usually do much pink, unless it is mixed with brown or some other color, but I decided to embrace the pink, as you can tell with this card.


This first card is for a Cricut Card Fairy mission and the assignment was to make a pink get well type card. I don't usually do much pink, unless it is mixed with brown or some other color, but I decided to embrace the pink, as you can tell with this card.
I used one of the doily cuts on the Cindy Loo cartridge and my Gypsy to hide the outside cut and position the cut on my card. I actually love the way it turned out!

This next card was done using the same technique, a different Cindy Loo doily, and no pink! I'm not sure if it shows in the pictures but it has a peachy/ivory/teal color theme. I love this card too, I think I will be doing more of these cuts!

Check out my next project before you go,
the link to continue hopping is there.